When Maria opened her tiny apparel label she thought the hardest part would be finding customers. After her first run of embroidered caps came back with blurred letters and uneven fills she learned something else mattered even more. The physical machine was fine, the thread was good, but the stitch file guiding the head was poorly made. Once she switched to quality embroidery digitizing services her batches stitched cleanly, waste dropped and customer complaints disappeared. That one change reshaped her whole production process and let her focus on design and sales again.
Below I link two important resources that explain the technical workflow and production tips for those who want machine ready results. Use the links to compare options and to see how a structured digitizing workflow can be integrated into your production chain.
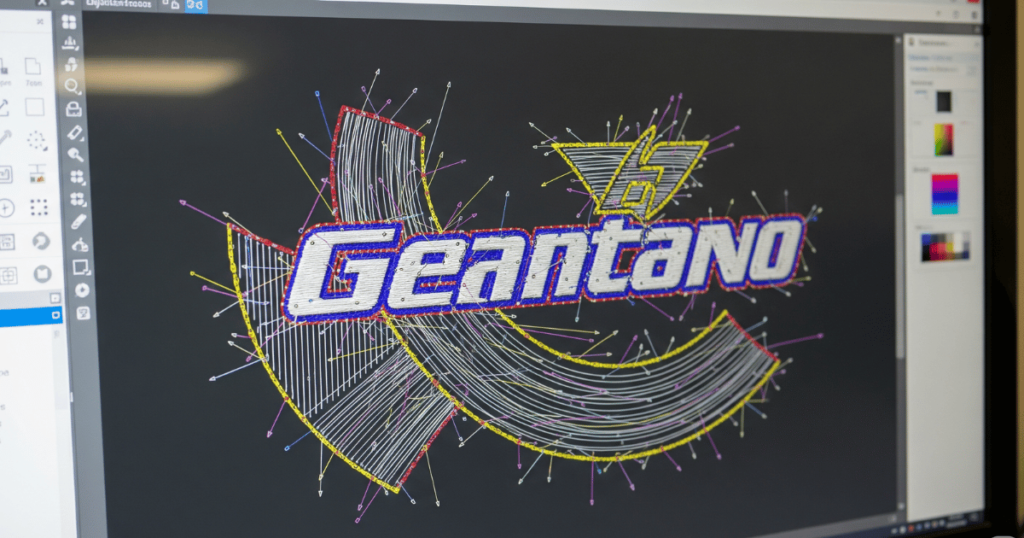
What the phrase embroidery digitize actually means
Embroidery digitize describes the conversion of an artwork file into machine readable stitch instructions. These instructions include stitch types, stitch density, stitch direction, underlay, pull compensation and the stitch order. Think of the digitized file as the blueprint for the machine. Without a precise blueprint the machine will still follow orders but the result can be distorted, puckered or weak.
The digitizer must translate visual detail into physical thread behavior. A thin line that looks fine on screen may be impossible to reproduce at two centimeters in thread. The digitizer chooses the right stitch types so that the thread lays flat, edges remain sharp and the design lasts through wash and wear.
Why production fails when files are poor
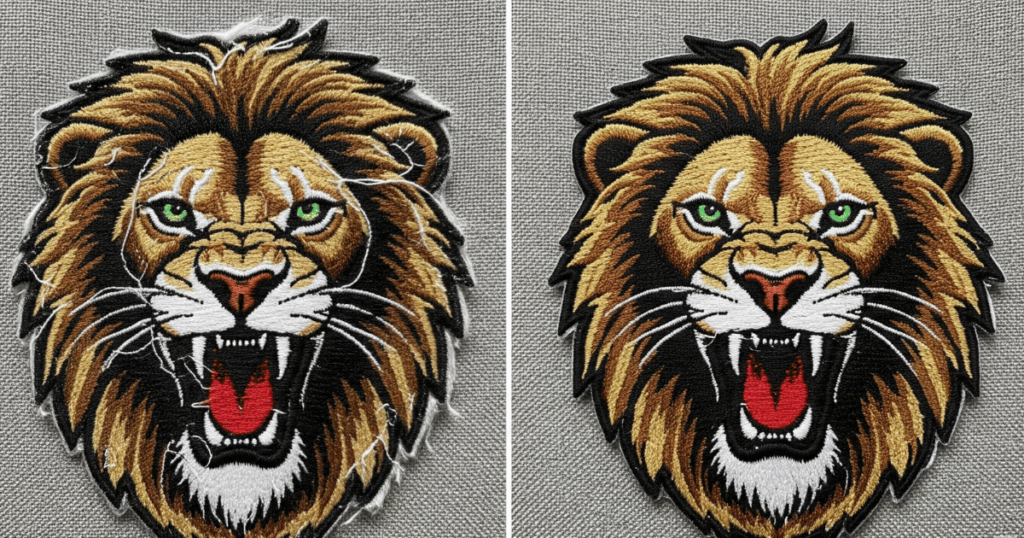
Poorly digitized files create a cascade of problems. Stitches that are too dense create puckering, stitches that are too sparse show gaps, and wrong stitch angles create ugly shine or flattening. Machines stop when threads break, and fixing time adds labor cost. For a business doing hundreds or thousands of units these failures pile up into significant losses.
A professional digital file anticipates fabric movement, needle to thread interaction and finishing techniques. It reduces operator interventions and prevents wasted blanks. For many shops the up front cost of a properly digitized file is recovered the first production run because fewer garments are ruined.
Key elements a good file must include
A polished digitized file contains several vital elements:
- Underlay stitching to stabilize surface fabric and prevent sinking
- Correct stitch density tailored to fabric type
- Pull compensation to prevent narrowing of letterforms
- Optimized stitch direction for consistent thread sheen
- Logical stitch sequence to minimize trims and jump stitches
- File formats that match the machines you will run
Each of these elements is adjusted by an experienced digitizer to suit the item you are stitching. Caps will need different treatment than fleece jackets. Patches have different constraints than woven labels. One size does not fit all.
The practical digitizing workflow
A typical professional process looks like this:
- Artwork review and cleanup to remove tiny elements that will not stitch
- Vector conversion when needed so edges are crisp
- Drafting stitch plan including stitch types and pathing
- Applying underlay, density and compensation settings
- Exporting in required machine formats
- Running a test stitch sample where possible and making adjustments
- Delivering final files with production notes such as needle size, backing type and machine speed recommendations
Running a test sample is often the single best investment because it reveals issues that only appear under real production speeds.
How custom approaches differ from auto digitizing
Automatic digitizing tools are fast and inexpensive but they use one size fits all rules. They do not measure fabric stretch or consider whether the piece will be made on a cap crown or a polo chest. Custom embroidery digitizing includes human judgement that adapts a design to the intended application. That is what makes the difference between a file that sometimes works and one that works consistently.
Custom approaches often include manual editing of stitch nodes, thoughtful underlay layers and hand chosen pull compensation. These steps prevent common mistakes that automatic conversions produce.
Cost versus value explained
Many small businesses resist paying for digitizing because it feels like an extra cost. But you must compare the fee to the cost of ruined inventory, machine downtime, operator labor and customer refunds. In many cases the cost to rework or discard a production batch exceeds the cost of a professional file considerably.
A useful rule of thumb is to ask how many blanks one ruined item costs you. If your blank costs more than the digitizing fee then the investment is self funding on the first corrected run.
Design preparation tips for better results
- Provide vector artwork where possible
- Avoid tiny text under 10 mm for logos
- Simplify gradients into block areas when possible
- Indicate intended dimensions and substrate
- Supply the machine model family when available
Supplying these details at the start shortens the first pass and reduces the number of revisions needed.
How digitizing affects different product types
Different goods present different digitizing needs. For example caps have a curved crown and often a center seam which requires stitch pathing that avoids distortion. Jackets can take higher stitch density but may need softer underlay to avoid stiffness. Patches allow denser fillings because they are applied to a stable base. Understanding these nuances is part of what a specialized service provides.
Quality checks every buyer should ask for
When you order a digitized file, request any of the following:
- A stitch sheet detailing stitch count and sequence
- A production note recommending needle size and backing type
- A low speed test stitch proof if available
- Multiple export formats for different machine types
Receiving this information with the file reduces guesswork for your production operator and helps reproduce the result on different runs.
Common errors and how digitizers avoid them
Typical examples of avoidable errors include:
- Tiny text that disappears after trimming
- Satin columns that collapse because of excessive density
- Fill areas that ripple due to lack of underlay
- Edges that fuzz because tackdowns are missing
An experienced digitizer will spot these in the artwork and recommend simple design changes or stitch modifications that preserve the look while ensuring production stability.
Production speed considerations
Running at full machine speed may expose problems that slow speed testing will not. Many digitizers advise initial runs at a slightly reduced speed for the first few heads to ensure the file performs consistently. After confirming stability you may speed up to full production. This approach reduces head specific errors that otherwise cause waste.
Why repeatability boosts brand trust
Using consistent digitized files means repeat orders look the same. Your customer expects a logo on the 50th shirt to match the first one they got. That consistency builds trust and helps you scale production across locations or vendors because the file contains the production rules needed to reproduce the result.
How to choose the right provider
Look for the following in a digitizing partner:
- Portfolio showing work on the product types you make
- Clear revision policy
- Knowledge of different machine formats
- Production guidance delivered with the file
- Willingness to run or facilitate a test stitch
Also ask whether they document back of stitch behavior, and whether they provide notes about stabilizer or needle choices. These small details help your operator avoid mistakes.
Case example that shows impact
A boutique brand ordered a run of embroidered tote bags and used a low cost auto file. The first batch had heavy puckering and edges that frayed after trimming. The brand paid extra to correct the file and rework the batch. Later they chose a provider who rebuilt the file with proper underlay and adjusted stitch density. The second run matched the design with minimal waste and the brand saved time and money overall.
The role of stitch counts and runtime
Understanding stitch count is important because it influences production speed and thread consumption. Digitizers optimize stitch paths to reduce unnecessary travel and trims. This not only lowers material cost but also reduces the number of times the machine must slow down to trim or change thread colors.
Export formats and compatibility
Ensure your provider can produce the formats your machines use. Most industrial machines accept DST. Home and commercial hobby machines often use PES, EXP or JEF. Ask for the formats upfront to avoid delays.
Small shops versus large scale production
Small shops often benefit quickly from professional digitizing because they avoid rework on expensive blanks. Large scale production benefits from consistency and reduced stops across multi head machines. Digitizing scales well for both scenarios because the file is repeatable.
Practical checklist before ordering a file
- Send the design in vector form when possible
- State the final size and intended substrate
- Tell the provider if you plan to use foam, chenille, puff or applique
- Request recommended backing and needle size
- Ask for a test stitch if your run is large
These steps reduce surprises and give the digitizer what they need to make a usable file the first time.
When to avoid complexity in design
If a design includes extremely fine gradients or photographic detail, embroidery may not be the right medium. Consider applique, printing or a hybrid approach where applique provides blocks of color and embroidery provides texture and edge definition.
How to manage revisions efficiently
Agree on the number of small revisions included in the initial fee. Provide consolidated feedback rather than incremental small notes so the digitizer can implement changes efficiently. A single round of consolidated changes is usually faster and cheaper than multiple tiny edits.
One provider note
A reputable option to explore for service oriented businesses is True Digitizing which handles a wide range of file types and provides production guidance with files.
Closing and final prompt
Embroidery depends on design, thread and machine but it really depends on the digital blueprint that drives the needle. Investing in quality files saves time and material, improves customer satisfaction and lets you scale with confidence.
Will you try custom and professional embroidery digitizing services for your next production run?
